# Creating a New Minipool (Validator)
As a reminder, a minipool in Rocket Pool terms refers to a unique smart contract instance on the Execution Layer (ETH1) chain that your node manages.
The minipool handles 16 of your ETH, 16 ETH from the rETH staking pool, and merges them together so that it can send 32 ETH to the Beacon Chain deposit contract to create a new validator.
Thus, in order to create a validator using Rocket Pool, you need to create a minipool.
WARNING
Creating a minipool means depositing 16 of your own ETH to the Beacon Chain. These funds cannot be retrieved until after the Execution Layer (ETH1) has merged with the Beacon Chain (ETH2), and withdrawals have been implemented. By creating the minipool, you are acknowledging that you are effectively locking these funds until that system is in place.
# Staking RPL
Before you can create a minipool, you'll first need to stake some RPL as collateral. At a minimum, you'll need to stake 1.6 ETH worth of RPL which is 10% of your total bond in the node. The exact amount of RPL will change based on the ETH/RPL price ratio, which is snapshotted on-chain at regular intervals by the Oracle DAO.
There is no maximum to the amount you can stake, though you will only receive rewards for the first 150% at each checkpoint - anything above that will go unrewarded.
NOTE
RPL stake isn't handled on a per-minipool basis. When you stake RPL, you do it for your entire node. This means you'll only need to handle the total RPL stake for your node if you plan to run multiple minipools.
# Staking via the Website (Recommended)
The easiest and safest way to stake RPL for your node is to use the website's new Stake-on-Behalf feature, which was introduced with the Redstone upgrade. This way, you can stake RPL for your node while the RPL is still in the wallet you used to acquire it. In other words, you don't need to send RPL to your node's hot wallet in order to stake it.
Select which network you're using from the tabs below to be taken to it:
Start by connecting your wallet to the website using MetaMask, WalletConnect, or any of the other methods the website supports. You will then be presented with this dialog:

This is a two-step process.
First, enter the amount of RPL you want to stake and click Approve - this will approve the staking contract to access that much RPL in your wallet, but no more than that amount.
TIP
You can approve more than the amount you intend to stake if you trust the Rocket Pool staking contract, and don't want to perform this extra Approve transaction each time you want to stake more RPL.
Once the RPL is approved, you will see this dialog:
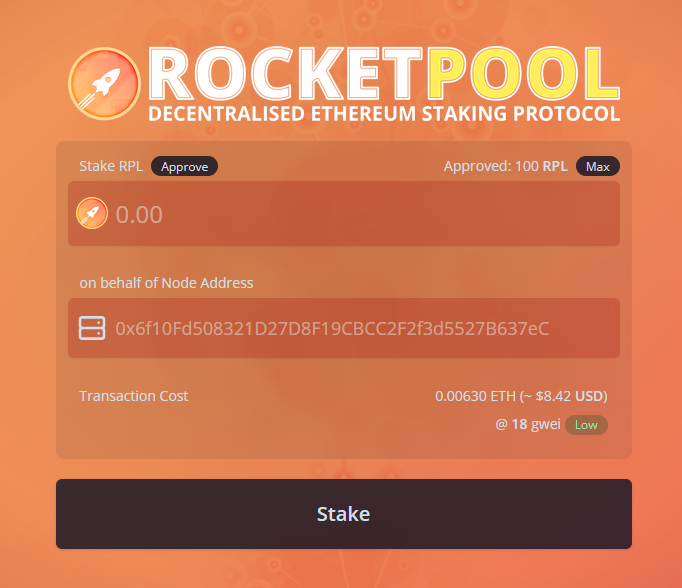
Enter the amount of RPL you want to stake in the Stake RPL box, and enter your node's address in the on behalf of Node Address box.
Make sure you have the correct node address before doing this!
If you need to confirm your node's address, you can quickly retrieve it via the CLI using the rocketpool node status command.
When you've entered that information, press the Stake button and approve the transaction.
It will be sent to the Ethereum network, and once included in a block, you're all set!
If you run rocketpool node status, you should see your staked RPL appear under the === RPL Stake and Minipools === section.
# Staking via the Node CLI
If you cannot (or do not want to) use the website to stake your RPL, you can also stake it via the node's CLI directly.
First, transfer your RPL from the wallet you acquired it with to your node's address.
WARNING
Please do this carefully and ensure you are sending the RPL to your node's address - transfers on Ethereum cannot be undone! Sending RPL to the wrong address will result in the loss of your RPL.
Use the rocketpool node status command to verify your node's address if you aren't sure what it is.
Run the following command:
rocketpool node stake-rpl
Here is the output:
Please choose an amount of RPL to stake:
1: The minimum minipool stake amount (284.477473 RPL)?
2: The maximum effective minipool stake amount (4267.162095 RPL)?
3: Your entire RPL balance (1440.000000 RPL)?
4: A custom amount
Select how much you'd like to stake, then confirm the operation.
The first time you run this command, it will involve two transactions - one to approve the Rocket Pool staking contract to access your RPL, and one to stake your RPL with it. Subsequent runs will only require the stake transaction, since the token has already been approved.
Once both transactions finish, you can check your staked RPL amount with rocketpool node status.
The following portion of the output is what you want to verify:
The node has a total stake of 11763.477483 RPL and an effective stake of 0.0 RPL, allowing it to run 41 minipool(s) in total.
This is currently a 0.00% collateral ratio.
The node must keep at least 10810.143971 RPL staked to collateralize its minipools and claim RPL rewards.
If the collateral ratio is 10% or higher, then you have enough staked to create a new minipool.
# (Optional) Finding a Custom Vanity Address for your Minipool
By default, when you create a new minipool, Rocket Pool will generate a random unique address for it. However, the Smartnode provides the ability to search for a custom vanity address for the minipool.
A vanity address is one where you personally pick the characters that the address starts with. This is a purely cosmetic exercise and will not have any practical impact on your minipool's operation. As Ethereum addresses are in hexadecimal, any of the following characters are legal:
0 1 2 3 4 5 6 7 8 9 a b c d e f
As a few examples, you could make your minipool's address start with a bunch of zeros (0x000000...), 0x600d (hex for "good") or 0xa77e57ed (hex for "attested", a fitting prefix for a minipool).
To find such a vanity address, you will need to search for it. This searching process involves picking a number, applying it as a "salt" to the hashing algorithm, and comparing the results against what you're looking for. The results are effectively random (though any given salt always produces the same result), so the only way to find an address with the prefix you want is to try lots and lots of them until you find a salt that works.
If you would like a custom vanity address to use for your minipool when you create it, you can use the following command to search for one:
rocketpool minipool find-vanity-address
This will prompt you for the prefix you want to search for, and ask which type of deposit you will be doing (a 16 ETH or a 32 ETH deposit - see below for more info on these types). Once you enter that information, it will begin trying lots and lots of salts until it finds one that produces your desired prefix!
Here is a complete example of the process:
$ rocketpool minipool find-vanity-address

Please specify the address prefix you would like to search for (must start with 0x):
0xa77e57

Running with 12 threads.
Found on thread 3: salt 0x5cd7fb = 0xA77E57c892C9e98B0B81289e4AfdA62fb59c5DDD
Finished in 1.91145873s
In this case, we searched for 0xa77e57 as the prefix and found the salt 0x5cd7fb which could generate it.
In the next step, when we create a minipool, we can specify this salt as an optional argument to create the new minipool at the address associated with the salt (0xA77E57c892C9e98B0B81289e4AfdA62fb59c5DDD as shown above).
In general, each additional character you search for will multiply the search time by about 16. Because of this, we recommend you only look for prefixes of 7 or 8 characters max unless you have a very powerful machine with many CPU cores. Otherwise, it might take prohibitively long to find a salt that produces the prefix you want.
For example, an AMD 5600x with 6 cores (12 threads) at 4.8 GHz can search about 3.2 million salts per second. On average, it will take a few seconds to find a 6-character prefix, a few minutes to find a 7-character prefix, and a few hours to find an 8-character prefix.
NOTE
The salt that gets generated is specific to the following variables:
- The network you're using (either the Prater Testnet or Mainnet)
- The node address
- The deposit type (16 ETH is currently the only valid option)
- The salt
If you change any of those variables, the minipool address for a given salt will change as well.
For more advanced usage (such as searching for a different node address or changing how many CPU cores are used for searching), take a look at the help text with rocketpool minipool find-vanity-address --help.
# Depositing ETH and Creating a Minipool
After everything you've done so far, you are finally ready to deposit your ETH, create a new minipool, and create an ETH2 validator. This is done with the following command:
rocketpool node deposit
TIP
If the market value of rETH is higher than its ETH backing (i.e., rETH is at a premium on the market), there is an opportunity to arbitrage the difference when creating a minipool.
The value of the arbitrage is equal to the amount of protocol ETH in the minipool times the premium (minus a small amount of gas).
E.g., if making a minipool when there's a 2.5% premium: 16 ETH * .025 = 0.4 ETH.
In other words, you could receive 0.4 ETH back during these conditions just for creating a minipool!
If you're interested in taking advantage of this opportunity, consider using the community-developed rocketarb (opens new window) tool to capture the profit of the MEV rETH arbitrage opportunity that launching your minipool creates.
To learn more about rocketarb, feel free to inquire about it on the RP discord server (opens new window).
NOTE
If you want to use a salt for a vanity address that you found using the process above, run the following command instead:
rocketpool node deposit --salt <your salt, e.g. 0x1234abcd>
DANGER
The CLI will then check to ensure that your Consensus (ETH2) client is synced. If not synced, then it will warn you in large red letters. A situation may arise where your ETH2 validator is activated before your Consensus Client (ETH2) finishes syncing. If this happens, your validator will be assigned attestation and block proposal duties on the Beacon Chain, but it cannot perform those duties until your Consensus (ETH2) client is fully synced.
In this situation, every missed attestation and block proposal will cause you to lose ETH! You will continue to slowly leak your ETH until your Consensus (ETH2) client finishes syncing.
In most cases, you should cancel the process and wait for your client to sync.
However, there are situations where the Beacon Chain validator queue is very long, and you believe that your Consensus (ETH2) client will finish syncing before your validator exits the queue and is activated. In this case, you may want to do the deposit anyway to save time and begin validating sooner. If you understand these risks and believe this is the case, the CLI will let you go ahead with a deposit anyway.
You will next be prompted with the network's current gas costs recommendations; confirm your gas price selection and follow the rest of the prompts.
Your eth2 client is on the correct network.

Your minipool will use the current fixed commission rate of 15.00%.
Your consensus client is synced, you may safely create a minipool.
+============== Suggested Gas Prices ==============+
| Avg Wait Time |  Max Fee  |    Total Gas Cost    |
| 15 Seconds    | 15 gwei   | 0.0244 to 0.0366 ETH |
| 1 Minute      | 10 gwei   | 0.0157 to 0.0235 ETH |
| 3 Minutes     | 7 gwei    | 0.0100 to 0.0150 ETH |
| >10 Minutes   | 6 gwei    | 0.0080 to 0.0120 ETH |
+==================================================+

These prices include a maximum priority fee of 2.00 gwei.
Please enter your max fee (including the priority fee) or leave blank for the default of 10 gwei:


Using a max fee of 10.00 gwei and a priority fee of 2.00 gwei.
You are about to deposit 16.000000 ETH to create a minipool with a minimum possible commission rate of 15.000000%.
ARE YOU SURE YOU WANT TO DO THIS? Running a minipool is a long-term commitment, and this action cannot be undone! [y/n]
y

Creating minipool...
Transaction has been submitted with hash <transaction hash>.
You may follow its progress by visiting:
<link to transaction>

Waiting for the transaction to be mined... you may wait here for it, or press CTRL+C to exit and return to the terminal.

The node deposit of 16.000000 ETH was made successfully!
Your new minipool's address is: <new minipool address>
The validator pubkey is: <new validator public key>

Your minipool is now in Initialized status.
Once the 16 ETH deposit has been matched by the staking pool, it will move to Prelaunch status.
After that, it will move to Staking status once 1h0m0s have passed.
You can watch its progress using `rocketpool service logs node`.
Note that creating a minipool is an expensive transaction! Pay close attention to the total cost and ensure that you accept it.
If you accept, your minipool creation will be triggered. Once the transaction completes, you will be given the address of your new minipool contract on the eth1 chain and its corresponding validator public key on the Beacon Chain. You can visit these with any block explorers if you'd like.
# Confirming a Successful Stake
Upon creation, your minipool will be put into the initialized state.
It will remain here until it's your turn in the Rocket Pool queue to be given 16 ETH from the staking pool so you can stake your new validator on the Beacon Chain.
Once this happens, your minipool will move into the prelaunch state for a certain period of time (currently 12 hours).
Your 16 ETH deposit will be transferred to be Beacon Chain, and the Oracle DAO will verify that it is all correct (opens new window).
During this time, you can observe the validator by looking up its validator pubkey with a Beacon Chain explorer such as https://beaconcha.in (opens new window) (or https://prater.beaconcha.in (opens new window) for the Prater Testnet).
You can check on the new minipool's status with the rocketpool minipool status command.
For example, when it has moved into prelaunch, you will likely see something like this:
1 Prelaunch minipool(s):

--------------------

Address:              <your minipool address>
Penalties:            0
Status updated:       2022-08-17, 01:24 +0000 UTC
Node fee:             15.000000%
Node deposit:         16.000000 ETH
RP ETH assigned:      2022-08-17, 01:24 +0000 UTC
RP deposit:           16.000000 ETH
Validator pubkey:     <your validator public key>
Validator index:      0
Validator seen:       no
Use latest delegate:  no
Delegate address:     <your delegate address>
Rollback delegate:    <none>
Effective delegate:   <your delegate address>


0 finalized minipool(s):
After this prelaunch period, your minipool will enter staking status and send the additional 16 ETH from the staking pool to the deposit contract.
This will be done by the rocketpool_node Docker container (or the rp-node service if you used the Native setup) - if, for some reason, you are taking abnormally long to enter staking status, looking at the logs for this container / service will likely tell you what's wrong.
You can check these logs with the rocketpool service logs node command (or /srv/rocketpool/node_log.sh on Native mode setups).
Running rocketpool minipool status will then show something like this:
$ rocketpool minipool status

1 Staking minipool(s):

--------------------

Address:              <your validator address>
Penalties:            0
Status updated:       2022-07-17, 20:01 +0000 UTC
Node fee:             15.000000%
Node deposit:         16.000000 ETH
RP ETH assigned:      2022-07-17, 18:58 +0000 UTC
RP deposit:           16.000000 ETH
Validator pubkey:     <your validator public key>
Validator index:      <your validator index number>
Validator active:     yes
Validator balance:    32.018460 ETH
Expected rewards:     16.010614 ETH
Use latest delegate:  no
Delegate address:     <your delegate address>
Rollback delegate:    <none>
Effective delegate:   <your delegate address>


0 finalized minipool(s):
Once the Beacon Chain accepts both of the 16 ETH deposits (one from you and one from the staking pool), your validator will enter the Beacon Chain queue where it will wait for its turn to become activated and start staking.
At this point, you're done! Congratulations! You have officially created a validator with Rocket Pool!
Have a look at the next sections in Monitoring and Maintenance to learn how to watch your validator's performance and health over time.
# Creating Multiple Minipools
Conveniently, your Rocket Pool node is capable of hosting as many minipools as you want. You do not need to create a new node for each minipool.
If you would like to make a second (or third, or fourth...) minipool for your node, all you need to do is run rocketpool node deposit again.
Note that you may need to stake more RPL first to maintain an overall collateral level of at least 10% before you do this.
Also, you won't be able to reuse an old vanity address salt - you'll need to search for another unique one for each of your minipools.
# Next Steps
Now that you have a minipool up and running, the next steps will walk you through how to monitor the health of your node, check for and apply updates, and maintain it throughout its life.
Please read through the Monitoring and Maintenance section next to learn more about these topics.